


The most common sprinkler timer Issues include timers that won’t turn on or off correctly, zones that skip or water at the wrong times, and display errors caused by power loss or ageing components. Most of these issues stem from programming errors, power interruptions, or wiring problems that you can often troubleshoot yourself before calling a professional.
Your sprinkler timer is the brain of your entire irrigation system. When it malfunctions, your lawn suffers. In Idaho Falls, where summer temperatures demand consistent watering and winter freezes require careful system management, a reliable timer keeps your landscape healthy year-round.
Key Takeaways
- Timer won’t turn on or off: Usually caused by power outages resetting the clock, incorrect AM/PM settings, or the dial left in “off” mode
- Skipped zones or wrong schedules: Often the result of programming errors, misconfigured run times, or faulty valve connections
- Display errors or unresponsive controls: May indicate power surge damage, dead backup batteries, or a timer reaching the end of its lifespan
- When to call a pro: Repeated blown fuses, voltage issues, or wiring problems signal electrical concerns that require a licensed technician
Why Your Sprinkler Timer Might Not Be Working
When your lawn shows dry patches or waterlogged areas, the problem might not be underground at all. The timer controlling your system could be the culprit. Before assuming you have a broken valve or leaking pipe, check the controller mounted on your garage wall or exterior housing.
According to the EPA’s WaterSense program, as much as 50 percent of water used for irrigation is wasted due to inefficient systems and methods. A malfunctioning timer contributes directly to this waste, either by overwatering certain areas or leaving others completely dry.
Issue 1: Sprinkler Timer Not Turning On or Off Correctly
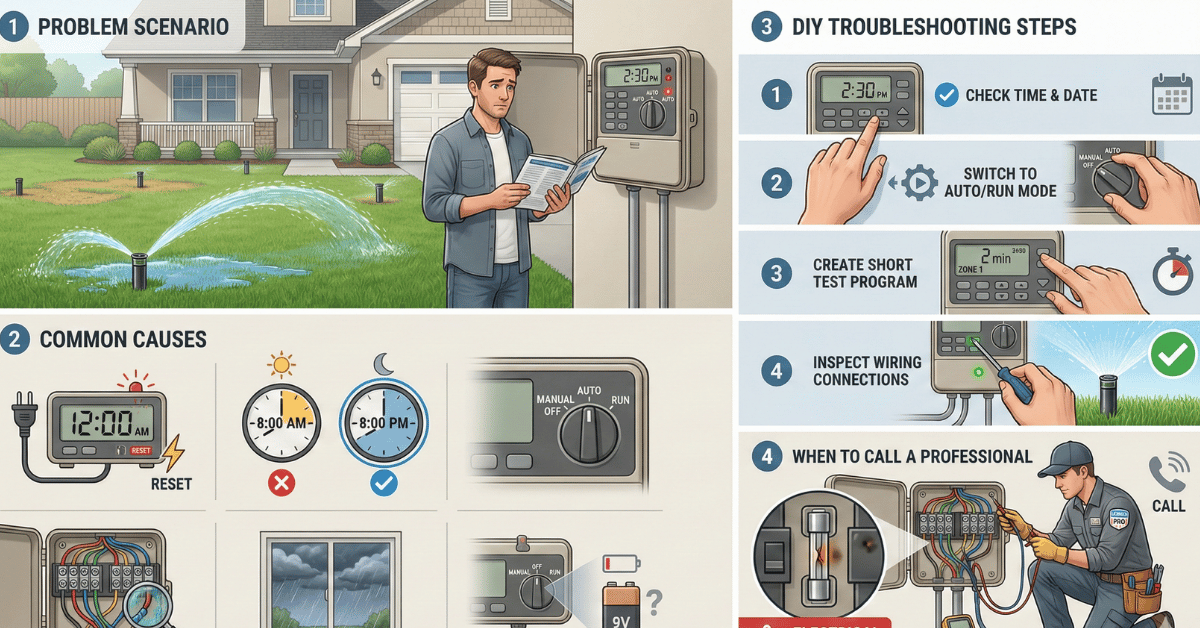
This is the most frustrating sprinkler timer problem homeowners face. You set your schedule, but nothing happens. Or worse, the sprinklers turn on and refuse to shut off.
What Causes This Problem?
Several factors can prevent your timer from operating correctly:
- Power outages reset the internal clock, erasing your programmed schedule
- Incorrect AM/PM settings cause sprinklers to run at 5:00 AM instead of 5:00 PM (or vice versa)
- Timer left in manual or “off” mode prevents automatic operation even with a valid program
- Loose wiring connections at the timer or valve disrupt the signal
Power disruptions happen frequently in Idaho Falls, especially during summer storms. Even a brief outage can scramble your timer’s memory if the backup battery is weak or missing.
How to Troubleshoot It Yourself
Start with the basics before assuming major damage:
- Check the display for the correct time and date settings
- Verify the mode is set to “auto” or “run,” not “off” or “manual”
- Create a temporary test program set to activate within two minutes to confirm operation
- Inspect all wiring connections at the timer panel for looseness or corrosion
If sprinklers activate during your test but not on schedule, the issue is likely a programming error. Consult your owner’s manual and reprogram from scratch.
When to Call a Professional
If your timer’s fuse keeps blowing, you likely have an electrical short somewhere in the system. According to DoItYourself.com, a repeatedly blown fuse indicates a short in the control valves or wiring, which is a potential fire hazard.
This type of electrical issue affecting your home requires professional attention. A licensed technician can safely test voltage levels and locate the source of the short.
Issue 2: Why Are Some Sprinkler Zones Skipping or Watering Incorrectly?
You programmed five zones, but only three are actually watering. Or one zone runs for two minutes instead of twenty. These inconsistencies leave parts of your lawn stressed while overwatering others.
What Causes Zones to Skip or Malfunction?
Zone-specific problems typically come from:
- Programming errors in the zone settings or run time duration
- Run time set to zero for specific zones (easy to overlook)
- Faulty solenoid or valve connection preventing the signal from reaching that zone
- Damaged or corroded wiring between the timer and the valve box
The wiring issue is particularly common in older systems. Underground wires degrade over time, and animals sometimes chew through protective coatings.
How to Identify the Problem Zone
Work systematically through your troubleshooting:
- Manually activate each zone at the timer control panel
- Note which zones respond and which remain inactive
- Run the self-diagnostic function if your timer model includes one
- Check your manual for zone-specific error codes or indicators
If a zone works when activated manually but not on schedule, the problem is programming. If it doesn’t work at all, you likely have a valve or wiring issue.
Why Seasonal Adjustments Matter in Idaho Falls
Idaho lawns have dramatically different water needs throughout the year. According to the University of Idaho Extension, cool-season grasses need about one inch of water weekly during spring and fall, but nearly two inches per week from late May through mid-August.
Forgetting to update your timer settings wastes water and money. The EPA estimates that the average family can save nearly 9,000 gallons annually by using a properly programmed controller.
If your zones aren’t delivering consistent coverage, or you’re unsure how to adjust for seasonal changes, a professional irrigation inspection can identify problems and optimize your settings.
Issue 3: What Causes Display Errors, Power Loss, or Unresponsive Controls?
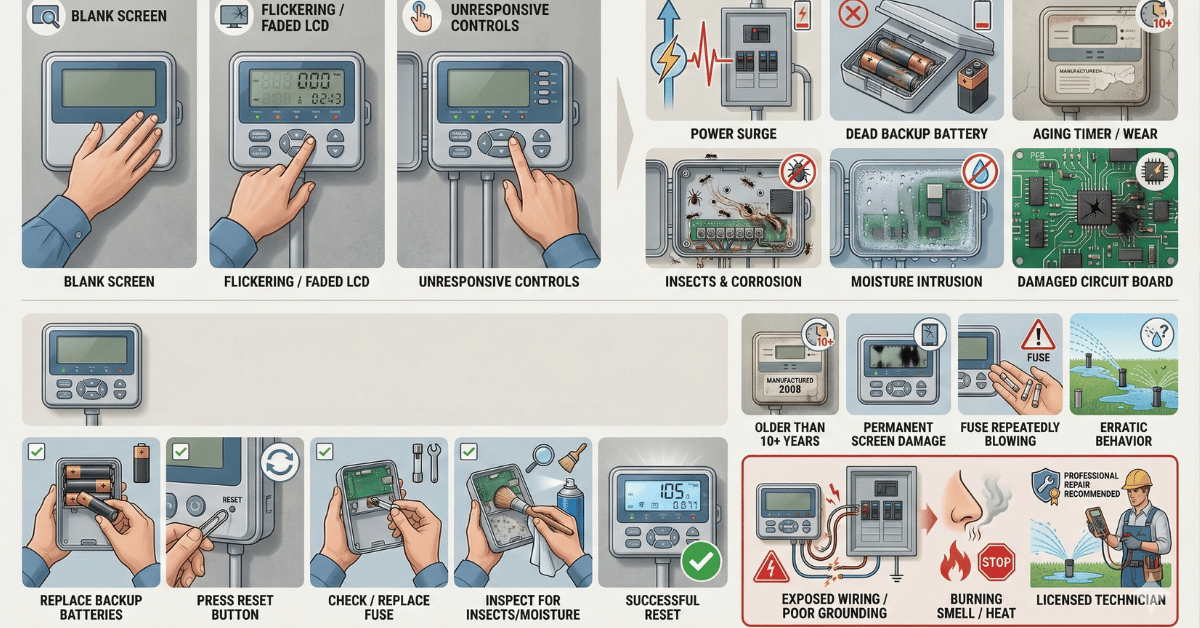
A blank screen, flickering display, or buttons that don’t respond all point to problems with the timer unit itself rather than the irrigation system.
Common Causes of Display and Control Failures
Your timer’s electronics are vulnerable to several threats:
- Power surges from electrical grid fluctuations damage sensitive circuit boards
- Dead backup batteries cause memory loss during outages
- Age-related component degradation affects timers typically after 5-10 years of use
- Insects or moisture inside the timer housing cause shorts and corrosion
The Insurance Institute for Business & Home Safety reports that $26 billion is lost annually to non-lightning power surges alone. Your sprinkler timer’s delicate electronics are just as susceptible as your TV or computer.
Quick Fixes to Try First
Before replacing the entire unit, attempt these simple solutions:
- Replace backup batteries (9V or AA depending on your model) even if they seem functional
- Reset the controller to factory defaults using the reset button (usually requires a paperclip)
- Check the fuse inside the timer box and replace if blown
- Open the housing and inspect for insects, ant colonies, or moisture damage
Many homeowners discover that a simple battery replacement restores full functionality after a power outage.
Signs It’s Time to Replace Your Timer
According to The Sprinkler Repair Company, most timers last 5-10 years with proper maintenance. Some sources indicate that higher-quality controllers can last 10-20 years.
Consider replacement if you notice:
- A blank or “bleeding” LCD display that won’t recover after reset
- A controller over 10 years old with recurring problems
- Repeated blown fuses even after electrical inspection
- Inconsistent operation that troubleshooting cannot resolve
When This Becomes an Electrical Safety Concern
Repeated blown fuses or burning smells indicate serious exposed wiring concerns that create fire hazards. Improper grounding leaves your entire system vulnerable to surge damage. These situations require a licensed electrician or technician, not DIY repairs.
Understanding your home’s electrical panel and how it connects to outdoor systems helps you recognize when professional help is necessary.
How to Protect Your Timer and Prevent Future Problems
Proactive maintenance extends your timer’s lifespan and prevents most common issues.
Use Surge Protection
Surge protectors integrated into your system’s wiring channel dangerous voltage spikes away from sensitive electronics. This investment protects not just your sprinkler controller but the solenoids and valves it controls.
Schedule Annual Maintenance
Just like your HVAC system benefits from regular home maintenance, your irrigation controller needs attention too:
- Test all zones before the watering season begins each spring
- Replace backup batteries annually, even if the display shows they’re fine
- Clean the timer housing to prevent moisture and debris accumulation
- Update seasonal settings in spring, summer, and fall
When DIY Troubleshooting Isn’t Enough
Most sprinkler timer problems respond to basic troubleshooting. Check your programming, replace batteries, reset to factory defaults, and test each zone manually. These steps resolve the majority of issues homeowners encounter.
However, electrical problems require professional expertise. If your timer keeps blowing fuses, shows signs of surge damage, or involves wiring concerns, contact a licensed technician. Attempting electrical repairs without proper training risks personal injury and further system damage.
At Ridgeline Heating and Cooling, we understand that your home’s systems work together to keep you comfortable. If you’re experiencing electrical issues affecting your sprinkler timer or other outdoor equipment, our team can help diagnose the problem and recommend safe, effective solutions. Give us a call to schedule a consultation.